Pages

Thursday, December 29, 2011

A New 49er for 2012

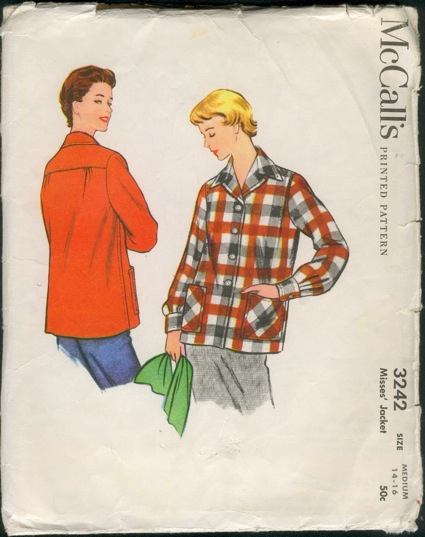
It's been some time since I last posted, but just because I've neglected to report on it, doesn't mean I haven't been up to anything! For one, I have been doing a lot of sewing (what else is new?), and I just finished up what is probably my favorite garment that I have made so far, a 49er style jacket.

Several months ago, I found a yellow and gray 49er jacket (posted here) in one of the bins at the Goodwill Outlet near Asheville. I wouldn't have known what it was, except I'd read some posts about them written by Lizzie of The Vintage Traveler. Here is a link to several of her posts. And here is a picture of that 49er-

I was very excited, and it turned out to be a perfect fit. I have gotten a lot of use out of it, but truth be told, the jacket has seen many better days....probably somewhere back in the 50s. Now it is peppered with moth holes, the wool is more felt and less fluff, and the buttonholes at the cuffs are torn. Also, someone replaced the buttons down the front somewhere along the line. Anyway, you get it! I wanted another one that was in nice condition. I found an excellent pattern match via Pattern Review, and the reviewer said it produced an authentic copy.

I bid on a small on eBay a.s.a.p. and hoped the fit would be ok.

WARNING- It's all sewing geek from here. If you aren't in to that, get out while you still can.....

Materials:
Thrifted wool blend- $2.00 for 1 1/2 yards
Thread from stash
Vintage mother of pearl buttons from Flea Market- $2.50?
Fusible interfacing

This pattern was absolutely perfect- when I first received it, I compared the pieces to my real 49er, and I can say that I wouldn't be surprised to learn that someone at McCall's had simply taken a 49er apart and used that as the pattern for this jacket. It is a near exact copy (there is a slight size difference in the pockets).

This was quite a project for me, as I have never sewed with plaid before, and I am just experienced enough to know that I need to try to match the plaid without really knowing how. So, I spent all of my free time for two or three days just prepping and cutting the fabric to the best of my ability. Overall, it came out pretty durn well, and I am really happy with how the side seams and sleeve seams match up.


I am also pretty pleased with the bodice front symmetry, and pocket and cuff symmetry that I somehow managed on this first go with plaid. The only place I wish I could have matched better is the front facings, as I forgot they would always be rolled out at the top. Well, I had only a yard and a half of this fabric in a 60" width, so I had to make due. I really love this jacket, so I'm not going to (figuratively, yuk yuk) pick it apart, and I say that about the facings only as a reminder to help in the making of other 49er knock offs.

In a nutshell, my advice on working with plaids is to take your time and cut them carefully, and if you have a limited amount of fabric, as I did, you will want to focus on matching the pieces in order of importance- the front bodice pieces first, next the back on the fold, then sleeves, pockets, etc.

From there, I followed the instructions closely (for the first time in a long time!) and hand basted EVERYTHING! I am learning that what seems like a lot of work actually saves time in the long run and obviously can lead to a more polished finished garment.

Other new methods I employed were helpful and fun to do. I found a great tip for turning points in Threads #157 pg. 78. I can't find it online, but it involves folding rather than trimming seam allowances when turning points, and I like it. Yeah, yeah, I like it.

 I cut the yoke on the bias for interest, and then I accidentally cut the yoke facing on the bias as well- unfortunately, that meant there was no straight grain piece for stability. So I used a light medium fusible interfacing on the back of the yoke facing. Remind me never to use fusible interfacing. I really don't like that stuff. I followed the instructions, and it did not want to fuse. So I turned the heat up high, and steamed and pressed the hell out of it, and it finally fused but seemed to be bubbling before I even had it on the jacket. That's ok- I already knew I didn't like fusibles, and that's why I put it on the facing where it couldn't cause too much trouble. I like how the yoke looks.
To finish it inside, I serged the side seams and sleeve seams and sewed them flat, like mock flat felled seams. The pattern leaves the collar, shoulder, bottom yoke seam, and cuffs finished nicely. I couldn't just leave the armscye seams, so I bound them in homemade navy bias tape. I also made shoulder pads using the tutorial from Casey's Elegant Musings, and I covered those and bound the edges as well. I used bamboo rayon and organic cotton batting for the pads, and it made me feel damn fancy. For those of you who love vintage patterns but have resisted the shoulder pad (no doubt due to memories of horrible 80s incarnations), you'd better learn to like them. If a pattern calls for them, it was drafted for them, and leaving them out will give a hollow spot and wrinkles across the upper chest. I don't mind them when they are smallish- I think they give a nice structural look to the jacket.
Finally, I just need to say this jacket represents everything I love about 40s fashion with my limited knowledge (the pattern is a 50s pattern, but the jacket debuted in '49, of course!). It is very wearable, and the design is all feminine details- the flanged shoulders, the gathered yoke, the pleats and gathers at the cuff, the top stitching and edge stitching, the wing-like collar, the bias patch pockets....I could go on.
They just don't make 'em like they used to. No, really. The new 49er has a trimmed back collar. I'll take the wings any day! See? My points turned out all right...pun intended! Har har! Get it? It's a sewing joke, snort!

Thursday, November 17, 2011

Made by Hand- Falling Leaf Placemats

I made these for Thanksgiving three years ago. It was fun and easy to do! I looked for inexpensive place mats (I think I found these at Big Lots for $1 each). They were white, so I dyed them with Rit to give them that uneven brown shade. I then hot glued ribbon along the stitching lines at the edges, and used fabric paint along with these and these leaf stencils to make the mats unique- each with it's own falling leaf design.


We'll be pulling them out again soon for our Thanksgiving meal, which I am excited to be making with my MIL this year (she is an awesome cook).

I am so thankful for those I love and that love me and for the times we spend together.

Friday, October 28, 2011

To Every Season, There is a Soup

Turn, turn, turn. 
Here is my recipe for the most fabulous split pea soup ever eaten in our household. It is also very easy to throw together, and tastes even better after it has been around a day or two. I made a double batch last time, and thought we'd have some to freeze (wrong!). 

We eat a very limited amount of meat, but if meat-less split pea soup doesn't work for you and yours, you can throw some pork into the mix. Although I will tell you, my husband slurps it up, and the poor guy is really only mostly-vegetarian-by-proxy. 


This soup is, as my mother used to say, delicious and nutritious!

Thursday, October 27, 2011

Bakin' Cookies

The other day baby and I mixed up some sugar cookie dough, and we have been having fun rolling and cutting cookies- a few here, a few there.

 It's so much fun now that she's big enough to help.
Not fall themed, necessarily, but we like to make the Star Wars cookies because it's fun to say "I am your father," and then eat them. 
Nothing beats soy milk and warm cookies!

Wednesday, October 26, 2011

Delightful Objects- Vintage and Antique Glass Bottles

I am a hoarder/collector of many things on a smallish scale, and I thought it would be fun to share some of these things from time to time, along with a little back story if applicable.

Today, I begin with my bottle collection. Once, it was pretty large, but over the years I have culled it to be something manageable that doesn't require too much space or dusting.
I love the jewel colors when the light comes through them. I dug many of these pretties out of a bottle dump myself back when I was in high school. I was really, really cool. I used to spend hours out behind my neighbor's house raking through leaves and dirt with a stick. I'd bring home big boxes of bottles all covered in mud, wash a few, and leave half of them in the basement. My parents loved that.

Some of my favorites among these are a La Choy soy sauce bottle, the clear one toward the center of the pic which has a honeycomb texture, and the dark pinkish ones my sister got me more recently as a gift. And of course the blue Milk of Magnesia bottles are always a hit. And I have a white Ponds cold cream. And a Bayer with the lid. And I love the brown ones. Oh! That's all of them!

Here is a pic I took in the winter- only a few of the bottles are in it, but I love how they look against the frost on the window.
My husband knew I had a little collection when we met, and one day he showed up where I worked with a vintage Crystal Club Cream Soda bottle for me. Isn't that sweet?

Are there any fellow bottle dump diggers out there? Anyone else like or collect vintage bottles?

I Did Actually Sew Those Dresses....

You know. The ones I talked about sewing a gazillion years ago? Okay, well, in January. No one can say that I am not thinking ahead. Ahem. Anyway, I said something about cranberry dupioni silk. Yuk yuk yuk. I ended up sewing a Matron of Honor dress for myself and a cute little dumpling dress for the baby using, get this, acetate taffeta. So I plan ahead, but I have more money in my fantasy life than I do in real life. Actually, I decided it made good sense to use less expensive material, as I probably won't wear this dress over and over again- I'll want to sew another one!  Here is the low down on the hoe down:

Simplicity 5343 copyright 1963
Simplicity 5343- My Version for 2011
That's my big sissy Jessica and I walking together as Matron and Maid of Honor
Yeah, it was "snowing a little down south" as my MIL said they used to say back in the day. Or, in other words, my crinoline was showing. Whatev. I won't beat myself up over that, and it's good it didn't show any more than that, as it was a last minute Franken-petticoat I made from netting from an A-line wedding slip and an old half slip.

Speaking of last minute, did you know that once people know you can kind of sew, they will show up places and expect you to make dress repairs and alterations at the last minute?
Brat! Me 'n my little sis pre-ceremony. Ain't she cute?
Here we all are in our Ladies' in waiting glory....
All of these beautiful ladies are my sisters.
 I have 5! Aren't we lucky?
Yes, my dress looks like a different color. That is because I am the only one in  shiny, shiny taffeta

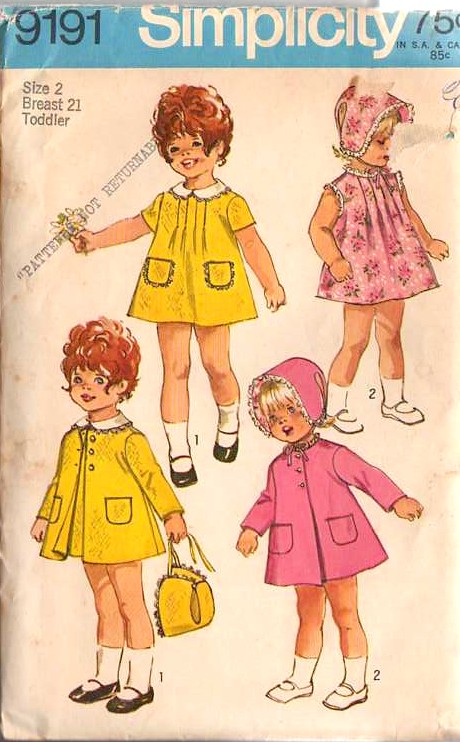
 And here is the pattern for the baby's dress- Simplicity 9191 copyright 1970. It is the same pattern I used for her Easter dress. I knew it fit.
And in the year 2011 it looked like this...

Her dad put her hair up, but she pulled out the ponytail in a nanosecond.  Later she decided she'd had enough of tights. 
And here is the Couple of honor, my other lovely sister and her husband.
Dashing, aren't they? 
I successfully sewed two formal dresses, one rather large, and one very small. Now for the dirt and details on the construction...in other words, if sewing isn't your bag, you are gonna wanna dip out now.

The fabric: I wouldn't say it was "from hell," but it certainly didn't come from that other place. It was a pain in the tush. It creased badly, marred easily, and it was difficult to press because of water spotting and changing color. And it was slippery. But on the upside, it cost me under $35 bucks for the fabric for these two dresses, and I still have some left. Tha's pretty sweet, right?

Adjustments: I made a size 16. I shortened the bodice by one inch and removed an inch at center front and center back at the neckline only, tapering to nothing at the waist. I have since made sense of the seam method for pattern alteration- the waist on this one was short because I removed the fabric at the waist instead of over the bust. I think I've got it now, doh.

Pattern Instructions: I have gotten pretty bad about reading these at all. I did refer to them many times to figure out those tucks. Those blasted tucks. Those tucking tucks. Shucks, those tucks were a pain.

So, I winged it. Wung it. Something like that. I underlined the bodice in a tricot interfacing. This worked very well. I used the glue method Gertie blogged about here to no ill effect. It was fast and the result was a less creased and wrinkly bodice. Actually, underlining made the fabric behave very nicely. I also lined the bodice with self fabric. I hand picked the zipper. I serged all seams, and I did a narrow hem. I wanted a deep hem, but I would have had to underline the entire skirt to hide the stitches. And I didn't do that. What I did do was mark my hemline, serge it, and turn and stitch it. Not the traditional method perhaps, but it worked out fine.

Problems: The blasted tucks. Did I mention the tucks? And the creasing. Wah wah wah! Actually, that was the biggest headache. I flew with hubby and baby to Maine for my sister's wedding, and I packed a separate, hard sided vintage suitcase for our dresses. I stuffed them with tons of tissue, and I wrote a sweet letter to TSA begging them not to wrinkle them all up.
What I love about it: I conquered that fabric and pattern. It was not easy, but I did it. I also practically applied my hobby to save us a good deal of money. Bridesmaids dresses are often expensive and ugly. Nuff said there. I got to make and wear something special and personal to a most special and personal occasion. You've got to admit- that does rock. And I learned a ton. I don't get sweaty palms thinking about slippery fabric. I made my own cording for the waist. And underlined. Oh, and I made those little flowers on the front from scraps and pearl beads.

What I would do differently next time: sew with a fabric I can press and steam like we're on a train to hell.

Me and my man on the dance floor
That's us at the end of the night, and this is the end of this post! That was fun, but I am tuckered (DOH!) out! Goodnight all!

Monday, October 24, 2011

At long last...a treadle!

I don't know why I have been wanting a treadle, but I have. Perhaps I
was afraid the power would go out in the middle of a seam. I will
worry no more-my red eye is belted up and ready for action. In fact,
last night I made a fried egg shaped pot holder with it. Why? Because
I couldn't think of any reason not to!

Friday, October 21, 2011

Un-Scary Cleaning

Halloween is almost upon us, and I like a good scare as much as the next gal.
I know the drill:
Don't look under the bed, or in the basement, closet, or that big wooden trunk.
Love me some Arsenic and Old Lace
But one place that hardly gets it's just deserves as a scary place in the home is under the kitchen sink.
AAAAAHHHHHHHHHHHHHHHHHHH! (This is not my cabinet!
Now, I know for most people, a few chemical cleaners and detergents are often necessary. We have those child lock thingys on the cabinets in which we store our dishwasher detergent, hand laundering soap, bleach, etc. And I know that chemicals are not all bad. If we were immune-compromised, we'd be glad to have Lysol and the like to keep the germs down in the house. However, we are average healthy folks, and in light of recent studies that point to over-cleanliness as a cause of many types of illness (Google "hygiene hypothesis"), I like to keep it simple. For 90% of the cleaning in our home, I use Dr.Bronner's Sal Suds.
I simply put a tablespoon or so into a spray bottle, fill it with water, and keep it close by for wiping down counters, the table, baby's high chair tray (which I do rinse), etc. etc. Since we use it as our dish soap as well, I find the spray bottle handy for soaping up large pots and pans, and I think it saves us money as opposed to pouring gobs from the bottle. And saving money means more thrifting cash for sewing supplies. Yeah!
Patterns scored on our recent camping/road trip


If you wish, of course you can do the same thing with Dawn or any dish detergent you prefer, but don't think that because Sal Suds is a naturally derived cleanser it is not strong- I spray it in the tub and watch the soap scum run off of the sides. Gross, huh? Plus, it smells like pine needles, and I like pine needles.


Yeah, and you can still pour bleach in the toilet and spray a little in the extra icky parts of the shower.
Wait! DON'T PULL BACK THE SHOWER CURTAIN!