

I was very excited, and it turned out to be a perfect fit. I have gotten a lot of use out of it, but truth be told, the jacket has seen many better days....probably somewhere back in the 50s. Now it is peppered with moth holes, the wool is more felt and less fluff, and the buttonholes at the cuffs are torn. Also, someone replaced the buttons down the front somewhere along the line. Anyway, you get it! I wanted another one that was in nice condition. I found an excellent pattern match via Pattern Review, and the reviewer said it produced an authentic copy.
I bid on a small on eBay a.s.a.p. and hoped the fit would be ok.

WARNING- It's all sewing geek from here. If you aren't in to that, get out while you still can.....
Materials:
Thrifted wool blend- $2.00 for 1 1/2 yards
Thread from stash
Vintage mother of pearl buttons from Flea Market- $2.50?
Fusible interfacing
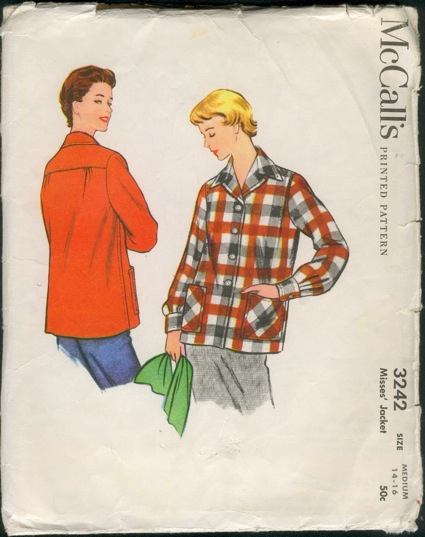
This pattern was absolutely perfect- when I first received it, I compared the pieces to my real 49er, and I can say that I wouldn't be surprised to learn that someone at McCall's had simply taken a 49er apart and used that as the pattern for this jacket. It is a near exact copy (there is a slight size difference in the pockets).
This was quite a project for me, as I have never sewed with plaid before, and I am just experienced enough to know that I need to try to match the plaid without really knowing how. So, I spent all of my free time for two or three days just prepping and cutting the fabric to the best of my ability. Overall, it came out pretty durn well, and I am really happy with how the side seams and sleeve seams match up.

I am also pretty pleased with the bodice front symmetry, and pocket and cuff symmetry that I somehow managed on this first go with plaid. The only place I wish I could have matched better is the front facings, as I forgot they would always be rolled out at the top. Well, I had only a yard and a half of this fabric in a 60" width, so I had to make due. I really love this jacket, so I'm not going to (figuratively, yuk yuk) pick it apart, and I say that about the facings only as a reminder to help in the making of other 49er knock offs.
In a nutshell, my advice on working with plaids is to take your time and cut them carefully, and if you have a limited amount of fabric, as I did, you will want to focus on matching the pieces in order of importance- the front bodice pieces first, next the back on the fold, then sleeves, pockets, etc.
From there, I followed the instructions closely (for the first time in a long time!) and hand basted EVERYTHING! I am learning that what seems like a lot of work actually saves time in the long run and obviously can lead to a more polished finished garment.
Other new methods I employed were helpful and fun to do. I found a great tip for turning points in Threads #157 pg. 78. I can't find it online, but it involves folding rather than trimming seam allowances when turning points, and I like it. Yeah, yeah, I like it.
I cut the yoke on the bias for interest, and then I accidentally cut the yoke facing on the bias as well- unfortunately, that meant there was no straight grain piece for stability. So I used a light medium fusible interfacing on the back of the yoke facing. Remind me never to use fusible interfacing. I really don't like that stuff. I followed the instructions, and it did not want to fuse. So I turned the heat up high, and steamed and pressed the hell out of it, and it finally fused but seemed to be bubbling before I even had it on the jacket. That's ok- I already knew I didn't like fusibles, and that's why I put it on the facing where it couldn't cause too much trouble. I like how the yoke looks.


