Pages

Friday, October 10, 2014

Oh, how far we've come...

As a vintage pattern/style enthusiast, over the past few years I have encountered many discussions via blog post or article regarding our romanticizing of times past, and how it leaves out an important part of the discussion. There is the age old "I wish women still dressed like that" debate. I have also read many other interesting pieces with social and cultural relevance. Then, today, as I was counting a pattern for my shop, I saw a facing piece of homemade newsprint. I like to scan these pieces to see what was in the news that was of interest at the time. This was simply the housing classifieds, but here's what I found today:
While ogling the gorgeous dresses and sweet styles of the 50s and 60s is fun, I'll keep my feet firmly planted in the modern era, thank you very much. I know things certainly aren't perfect today, and yes, people do wear their pajamas in public (I really don't care- who am I, the fashion police?) but we sure have come a long way...wouldn't you say?

Thursday, October 9, 2014

Pattern Sale!


I am having a clearance sale in my Etsy shop, Farmhouse Garden . Nearly 100 patterns are listed under $5 each, many as low as $2. Also, as the old-old go out, I am listing some new-old gems! You can visit by clicking the "shop" link under the header if you are on a desk top.

Clearance Patterns

Fresh off the Counting Table

Stop on by!

Thursday, October 2, 2014

The "Match the Garment to the Pattern" Game


Have you ever come across a hand sewn vintage garment that you could match to a pattern? I thought I had matched a garment to its pattern once, but I was wrong (and later found an ILGWU label in the skirt of that set).

The other day, while out thrifting, I found a pile of patterns and proceeded to rifle through them, choosing which ones would follow me home. After finishing that up, I took a peek at the dress rack in the shop, to see if there was anything fabulous on it. Lo and behold, there was a very familiar looking dress there...

In fact, there was a pair of them. 


I rifled back through those patterns I had just picked up, and found the match. It surely helped that the seamstress had taken the pattern illustration's color suggestion! 

Have you ever matched a pattern to a vintage dress in the wild? 

Friday, September 19, 2014

Cheap & Easy Vintage Pattern Storage

I have A LOT of vintage sewing patterns. I know I am not the only one! It has been discussed in various interwebby places that these are articles that should be preserved. There is the whole "to trace or not to trace debate" (we aren't going there today), and there are various opinions on pattern storage. People store their patterns many different ways- today, I'm going to tell you how I store mine. It is a cheap and easy method, because I am a cheap and easy kinda girl.

First of all, I have to separate my personal patterns from my shop patterns. I have two separate filing cabinets for this- one two drawer narrow model and one four drawer narrow model. In the two drawer, the top is mine, and I have my patterns divided by garment type. In the bottom drawer, I keep patterns for my daughter on one side organized by age and (a few sad) patterns for my husband on the other side.
Pretty on the Inside
In the large filing cabinet I have all of my shop patterns organized numerically regardless of brand, and oversize Vogues and other types are kept numerically ordered in their own spot in the back of the top drawer. I don't have a huge pattern shop (yet! I need to get some listings up!!!), and I used to just put them in storage as I counted them and root through later to find the one I wanted. This is so much better. My husband went through and organized them all for me. Isn't that sweeeeeet?


One day, I hope to buy a real pattern cabinet, but, being a dunce I have passed over two already that sold for a few ten-spots, and I will probably never see another one for sale again because I don't deserve it.

Moving on- all of the organization stuff is well and good, and we all do that our own way. However, I have a little handy storage tip. After counting each pattern, I place it in an acid free binder sleeve from the Dollar Store, usually sideways, with the excess folded in back. They cost about 5 cents apiece.
Image From Dollar General's Website

All my gals, snug, well ordered, and happy!

This affords a snug fit for the pattern and prevents any further jingle jangly wear and tear. Also, the acid free, moisture resistant storage helps keep them looking their best, and hopefully preserves them for future generations of seamstresses and seamsters. I usually just leave the 3 ring white edge on, but I trim them neatly prior to sending them to their future homes. I store two rows side by side in the cabinet. The McCall's creep into the other row, but I have more Simplicity than anything else, so it isn't a big problem.

So, this is how I do it. What are your tips for pattern storage and preservation?

Monday, September 15, 2014

Sorbetto Bow Blouse

I have played with the Sorbetto Top by Colette Patterns a fair amount now. I have it so I really like the fit, which involved angling the darts more (much more flattering to a small/medium bust) and lowering the underarm. I have made it as a back button blouse, 


a pajama top, and even a dress! 

Because the fit is good, I feel comfortable testing my amateur pattern manipulation skills on it. 

For my latest version, I decided that I am over the bias binding at the neck and arms. It always feels constricting and causes pulling. Instead, I drafted facings. I also raised the back neck 3 inches and lowered the front neckline about an inch and a half. I underlined the sheer, crepe fabric I used with a mystery navy lining purchased in the thrift (that's where the polka dot fabric came from, too). I used the glue trick to marry the two except at the darts, where I hand basted. From there I used french seams on the shoulder and side seams, stitched in the facings which were serged along the lower edges, hand hemmed the bottom with lace hem tape, and neatened it all up by stitching the facings and hem to the underlining. 

For a little more personalization, I stitched a rectangle, top and bottom, at the neckline and made a long tie to go with it so I could have a bow blouse. 


I love how this top turned out. It is easy to wear and, to me, looks polished and classic. These are adjectives I would like to be able to apply to my wardrobe more often, and I am trying to sew up some versatile basics. 

Saturday, August 23, 2014

Two Piece Summer Halter Dress

Over the summer I was called away from home on some unpleasant business that took me out of state for five weeks. I knew I didn't want to be without my sewing for that long, so I packed up my trusty vintage Kenmore portable along with a bursting at the sides compact tin box of fabric and notions.

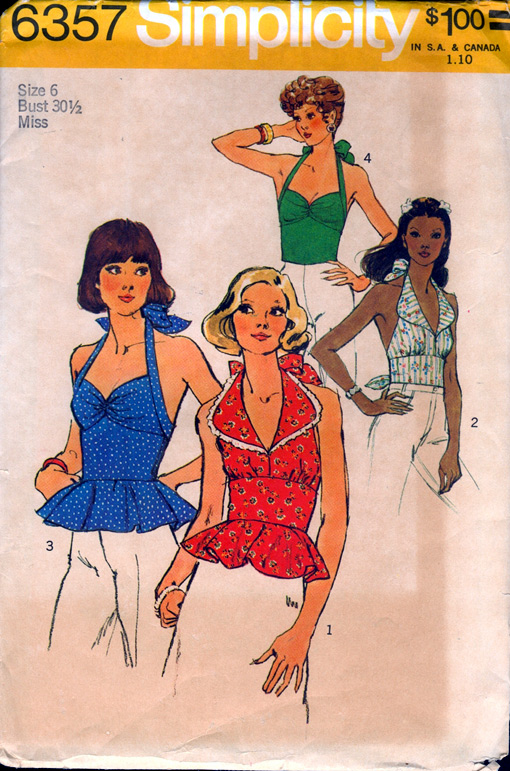
I had already begun Simplicity 1365 ( a reproduction of 6357, which I also own) in a light cotton fabric I picked up.....wait for it...... in the thrift shop. I wanted to attempt to make a halter style that could be worn without a bra, so I made cups out of bamboo batting and sandwiched them between the fashion fabric and my muslin lining.


 The rest of the process was pretty straightforward. There were times when I followed the repro pattern instructions, and parts where I looked back at the vintage pattern instructions, which were less beginner friendly and more dressmaker appropriate. All in all, it makes for a very well finished garment with all seams enclosed in a nice cotton lining. Drat. I should have photographed the inside.

Anyway, I paired the halter up with a simple dirndl skirt made up from what I could eek of the remaining fabric. I love this skirt. It is so comfy and closes only with a pants hook and snaps. Here are a few finished pics.
Halter with high waist vintage 70s jeans, or as my sis calls them, my "mom jeans."

the perfect outfit for that insane Florida heat 

 After I finished this get up, I promptly went and ate an enormous ice cream in celebration.
A perfect end to a lovely project. 

Oh, and just because I am so sososossosososososososososos super excited, can I show you what I bought?  Can I pleasepleasepleasepleaseplease? 
I LOVE her. How lucky can one gal be? A Wolf form, in my size.... I love her. She was an absolute steal, and I feel so fortunate. Anyone looking for a Singer adjustable????

Tuesday, August 19, 2014

Tips from a Vintage Sewing Supplies Hoarder

When at the thrift shops, don't forget to check the pillowcases for feed/flour sacks. These are commonly misplaced among the bedding and sold for pocket change. Case in point: I found this lovely and unusual sack in a pile of pillowcases just today.


Have you ever found a feed/flour sack in with the pillowcases?

Friday, August 15, 2014

Friday Fabric Find


This is a floral seersucker marked Copyright Peter Pan Fabrics Inc  which I purchased at the thrift today. I love a vintage fabric bargain, and this fabric is super sweet!

Retro Pajamas for Meeeeeeeeeeeeee!

I purchased a pile of vintage knit fabric at auction a couple months back. Some was, of course, quite hideous, while some was kitschy retro cute. I do recognize that this is in the eye of the beholder, though. 

For a quick, easy project, I grabbed a medium weight spongy retro knit and stitched up this nightgown using Simplicity 7096.


Well, I mostly just used the yoke pieces, as I cut the yardage to a length I thought would be comfortable (somewhere between views A and B), and cut equal front and back panels from the width. The fabric was pretty wide, so I got both the front and back from one length. Then I used the pattern as a template for the underarm. 

This was stitched entirely by machine using the "burrito method" I learned from Janet Pray's Sew Better, Sew Faster Craftsy Class. There's not too much to say about construction. For a sweet touch, I included some leftover ric rac trim across the yoke and pressed and stitched it down in a bow motif. I added one of the vintage buttons from my stash, and the gown was done. Now all I need are some fuzzy slippers and hair curlers!


Thursday, August 14, 2014

Tip for Assembling a PDF Sewing Pattern

I used this quick method for assembling my Mabel PDF the other day, and I thought it might be of use to someone else, too. 

First, staple together, preferably in order, as many sheets as you think you'll be able to cut through with a rotary cutter. Take care to straighten the edges, and run staples up the left side without bending the stack. 
 Next, hold a ruler on the border/cutting position and cut along it with your rotary cutter. I always cut the right side and the bottom extensions/overlap off. Repeat the stapling and cutting process until all of your sheets are cut.
 Now you are ready to assemble! Position your pages in order, and tape all of the pieces in each row together. I use Scotch Magic Tape for my PDF patterns, as it can be removed and reapplied if something is off.

 Once you have your rows taped, join them together. Fix any places where the paper doesn't meet correctly by pulling the tape up gently and repositioning. Simple and fast!

Thursday, June 12, 2014

"Soogar Skulls Sirt"

The little one is still working on her "s" sounds. I love her little voice. I know that, as well as she speaks now, she will soon have all the kinks worked out, and those cute kid-isms will be gone forever. In the meantime, I sewed her a shirt that has her practicing those "s" sounds. 
I used two $1 Walmart bandanas for the body of the shirt. The sleeves are raw silk from a pile I bought a few years ago at the thrift, and the fabric is super soft. I serged the innards for tidiness, and I couldn't resist using one of the tacky "by Mother" tags I found a few days ago. 

The pattern is the Ella Raglan Top by I think Sew. I have already lengthened it and cut a dress from one of hubby's old work/dress shirts. It is a nice pattern, quick and easy to sew, and great for using small amounts of fabric or repurposing. I'll likely make another just like this in green bandana fabric shortly. 

I bought some new patterns recently and am excited to dive head first into summer sewing projects!

Tuesday, June 10, 2014

Favorite Sewing Tools and Tips

Have you ever tried putting Scotch 1/2" tape on a zipper seam as a guide? I always had a hard time making my stitching straight with only a zipper foot and no real guide. This goes on easily, helps one stitch an even 1/4" to either side of the zipper opening, and then peels right off. Give it a try!
I am in the process of sewing a very "Princess-y" dress for my daughter from a brand new Simplicity release. Pics to follow when it is finished!


Wednesday, May 28, 2014

Beaded Top Complete

It has the usual Alabama Chanin pattern fit issues (armscyes gaping, tightness at bust), but I still like it and will surely wear it plenty. 
If you look behind me you will see that our house has been pressure washed and the shingles freshly stained. Nothing like prepping your deck for stain to bring on the daily rain showers! Hopefully we'll get some clear skies soon so we can finish this project up and prepare for some summer chilling and grilling.

Tuesday, May 20, 2014

The Importance of Pattern Placement

I mentioned this a few days ago in my Sorbetto post as something I'd like to work on. It's nice to know that even pattern illustrators struggle with this from time to time....
See it yet? Let's look a little more closely....
"Why are you looking at me like that?" 

Couched & Beaded Bolero from an Alabama Chanin Pattern

This bolero project from Alabama Studio Sewing & Design took me a week or so to complete. It is "stenciled" in green fabric pastel, has couched cords applied, and is beaded over the stenciling. I added heavy sequins and beads to a few leaves. I also beaded the binding only on the front of the bolero. 

These are rewarding projects with a lot of visual impact. If you enjoy hand stitching, I recommend the Alabama Chanin books with one word of caution- I have found the pattern drafting to be iffy. I recommend making a quick muslin to check fit. The original bolero armholes were far too snug for me and would have caused a lot of wrinkling. 


Monday, May 19, 2014

Two Summer Sorbettos


This one is a fun make from feedsack fabric and vintage buttons. I piped the pleat in white and layered that with large ric rac. It is finished with self bias. The only tricky but here was that, in order to get the pleated Sorbetto out of a feed sack, I had to piece the pleat, cutting both the two front pieces and the pleat itself with a narrow seam allowance. 


I received this fabric as a birthday gift last year. I didn't notice there was a lady in a red dress perched on my boob until just now. Note to self- pay better attention to pattern placement. 

So, for this Sorbetto, I drafted a button back and collar. I really enjoyed wearing it, however after a few washes it became apparent I had trimmed the collar seam allowances too short. Now the top sits in the mending pile waiting to have the collar removed. Lesson learned!