Oh wait, Mom, so are you. In fact, it's the whole fan-dam-ily!
A few weeks back, my crazy fun family descended on Cape May N.J. for a fun filled wedding weekend in celebration of my older sister Jessica and her husband Alex's big day. The New York Times covered the event for it's Vows section.
It was a magical day, and therefore completely apropos that my sister arrived at the ceremony by unicorn. Don't believe me? See for yourself.
The wedding ceremony was on the beach, in March, in N.J. at 5 p.m. Holy flying unicorn, it was cooooolllllddd. I was raised in Maine, and I still froze my fanny off. Well, my powers of deduction are strong, and I knew it was going to be cold, so I decided 3 days or so before departing for the wedding that I needed a pretty jacket to keep me toasty on the beach. That didn't happen- I would have needed to make trench coat out of a sub-zero sleeping bag to stay toasty in that gale. Still, I looked nice! And you can't really see the frostbite in the photos.
 Oh wait, yes you can. And damned if my husband didn't get a single full length shot of my dress and jacket. I don't fault him though; it's hard to focus when your eyes are frozen shut with happy tears. Luckily, I had taken several terribly lit before and after photos in my sewing dungeon.
Here is the before.

I knew I wanted something white, preferably wool, and also fitted or cropped. I browsed all my favorite thrifty spots, but didn't find anything. So, of course, the next logical thing to do when you are just about to leave for a 5 day road trip is to begin a major refashion project with no clear plan. And that's exactly what I did.
I decided to focus on fabric, so for $3.50 I bought a lambswool blazer at Goodwill. It was quite large for me, so there was a lot of extra material to work with. Somewhere along the line I decided I wanted a peplum jacke because that sounded cute and formal and trendy. I really had no idea where to begin, but I didn't have very much to lose, so I forged on fearlessly.
 First, I removed the pocket. I unpicked it, shaved it. Yes, that's right, shaved it with a leg razor, and then lint rolled and steam pressed it. Buh bye pocket.
Okay, moving on. Next, I removed both sleeves, marked the waist, and cut the jacket bottom off about an inch below it. It's easy for me to forget things like leaving seam allowances, so I took it really slowly.

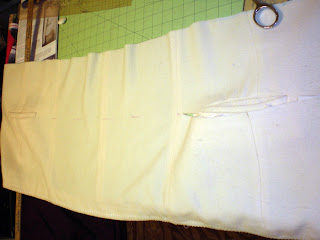

 I started to reattach fabric for the peplum. I pleated it for flare at the hip, and hid any seams in the pleats.
 I ended up leaving the back and side seams of the peplum open. Stitched shut, there just wasn't enough fabric to keep it from hugging instead of flaring.

I ended up opening the back seam up later too. Remember, I had not yet frozen my fanny off at this point.
I recut the sleeves at a bracelet length using a sleeve from a pattern I had recently used, and I cut away the extra fabric at the armholes using the same pattern as a guide. This is the only part I don't love. I had to work with what I had, but I prefer a sleeve head with some loft. Still, they turned out better than I expected, and I ended up with a wearable jacket. Actually, I ended up with a jacket that I rather like. I have already worn it since we've been home, and I like it with jeans too!
Without further ado, here is a photo that was so poorly lit and unflattering I had to crop off the top of my head.


I made a decorative stick pin to use as a closure. I just couldn't decide on a button, so this was a good non-permanent solution. I chose a pretty button, put a long ball topped pin through the shank, and used super glue to stick them together. Also, I prefer to wear it with the lapel unrolled, but maybe that's just because I was freezing and needed that surface area covered. Actually, I think it seems right for this style.
So, here is a before and after....

and here I am with my sis the lovely bride, a unicorn, hubby and the kid.
I love this pic, but brrrrrrrrrr! Even Pebbles the Unicorn looks cold!!!! The things we do for love!
A few weeks back, my crazy fun family descended on Cape May N.J. for a fun filled wedding weekend in celebration of my older sister Jessica and her husband Alex's big day. The New York Times covered the event for it's Vows section.
It was a magical day, and therefore completely apropos that my sister arrived at the ceremony by unicorn. Don't believe me? See for yourself.
 |
| Photo Credit: Jessica Kourkounis for The New York Times |

Here is the before.

I knew I wanted something white, preferably wool, and also fitted or cropped. I browsed all my favorite thrifty spots, but didn't find anything. So, of course, the next logical thing to do when you are just about to leave for a 5 day road trip is to begin a major refashion project with no clear plan. And that's exactly what I did.
I decided to focus on fabric, so for $3.50 I bought a lambswool blazer at Goodwill. It was quite large for me, so there was a lot of extra material to work with. Somewhere along the line I decided I wanted a peplum jacke because that sounded cute and formal and trendy. I really had no idea where to begin, but I didn't have very much to lose, so I forged on fearlessly.

 |
| See, it's gone! Like magic! Alright, I know. Who cares? |
 |
| See? Still gone! |


Next, I harvested the fabric below the welt pockets for my peplum. I just measured from the bottom so it was even and cut straight across. Alright! I was moving and grooving! Except I still had to make this potato sack fit up top. The goal was fitted peplum, and this late 80s early 90s horror was fitted for my husband. And that is certainly not his look!
I played with the bodice, pinning out here and there for a while. I knew I needed to keep the grain intact, but wasn't sure how to pull it off. Then I had a light bulb moment and .......

unpicked the shoulder seam to add a dart there for shaping. This also pulled the front armscye closer to where it should be on me. Alright, okay, this might work out........ I basted the darts and everything else I did initially so that I could remove it and try something new if I flubbed up.


I ended up opening the back seam up later too. Remember, I had not yet frozen my fanny off at this point.
I recut the sleeves at a bracelet length using a sleeve from a pattern I had recently used, and I cut away the extra fabric at the armholes using the same pattern as a guide. This is the only part I don't love. I had to work with what I had, but I prefer a sleeve head with some loft. Still, they turned out better than I expected, and I ended up with a wearable jacket. Actually, I ended up with a jacket that I rather like. I have already worn it since we've been home, and I like it with jeans too!
Without further ado, here is a photo that was so poorly lit and unflattering I had to crop off the top of my head.


I made a decorative stick pin to use as a closure. I just couldn't decide on a button, so this was a good non-permanent solution. I chose a pretty button, put a long ball topped pin through the shank, and used super glue to stick them together. Also, I prefer to wear it with the lapel unrolled, but maybe that's just because I was freezing and needed that surface area covered. Actually, I think it seems right for this style.
So, here is a before and after....

and here I am with my sis the lovely bride, a unicorn, hubby and the kid.
 |
| Photo Credit: Alex Smith |