Pages

Showing posts with label kids. Show all posts

Saturday, November 16, 2013

Sewing with (and for) Kids- Make it Better Yourself

My daughter has been pining after a headpiece with a veil for play (she loves dress up), so she and I made up a fascinator a couple of days ago during our crafty time.

We began with a round cut out of felt. She chose pink, and I stitched a couple small darts in it to make a dome shape, then I trimmed the edge in bias. Rooting through my drawers stuffed full of notions, the wee one selected the trimmings- a purple fruit net veil, some gold ribbon fringe, a bow, and a little bling. The veil and ribbon were attached by machine, while the bow and rhinestone were simply hot glued on.

We had a nice time making it together- there is just so much she cannot yet do in the sewing room, but she sees me sewing and wants to be a part of it. This was great, because she got to choose the trims and act as designer, and when she wore her fascinator in the coffee shop later that afternoon, my daughter received several compliments on it. I hope she, too, will learn to feel a deep satisfaction in "making it better" herself.
But, until she gains the skills herself, I will be sure to keep her well outfitted in cute, home sewn clothes...
Autumn Dress made from Butterick 2194
even when she's sleeping...
Slippers scaled up to a toddler 9 from the Norman pattern by I Think Sew,
Sleep mask sized down from Sew4home.com
and know that she feels the love that I put into each pint-sized garment.

But, I've also got to do some unselfish sewing to keep myself happy....
My slippers made from the Amber Pattern at Ithinksew.com
and my feet warm! The kid was stylin', and my old slippers actually had holes in them! 

Saturday, May 25, 2013

Summer Sewing Big & Little

I needed some high waisted shorts to go with that 40s Fun-Shus blouse, so I threw this green denim pair together on Saturday. I used McCall's 8331 again.
I added a ribbon waistband using a fun lipstick print instead of a facing, and I hand picked the zipper. I think since the first several zips I sewed were hand picked, I just don't like the way a machine sewn zip looks most of the time. We all have our hang ups.
I also made the tank up from a thrifted tee. I did a little embroidery on top of the screen print just for fun.
It's been raining A LOT, and I didn't get any good pics, but you get the idea. 
I did some pattern work on the shorts after this to replace the darts with seams, and the next pair I make will have piping in the seams. I'd like to incorporate this piping, which I made by covering white store bought piping with white lace. I think it would look really pretty using contrasting colors of piping and lace too. I originally made this corded piping for my bridesmaid's dress, but didn't end up using it then. I did use some on an Itty Bitty project I whipped up the other night though.
My little bunny got a 24 hour stomach bug a few days back. She projectile vomited in the hall, and finished the day with a fever of 103.9. Yikes! As she slept a lot being sick, I took the opportunity to sew her a pretty dress to help her feel better. I used the Itty Bitty Toddler Dress Pattern from Made by Rae after seeing a sweet baby version on the blog Tilly and the Buttons. I seriously love sewing things while my daughter is sleeping and hanging them up in her room for her to find in the morning. She gets excited and always wants to wear them right away!


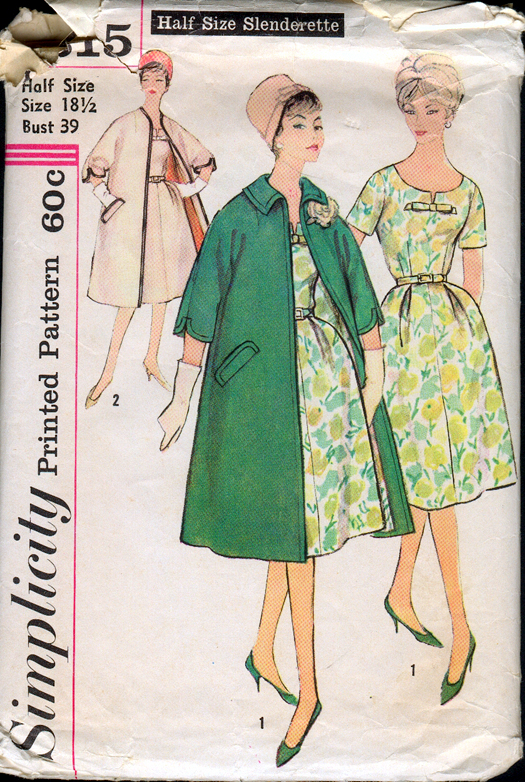
 Totally unrelated to anything- in counting some patterns for my Etsy shop recently, I discovered that, sadly, Simplicity 3315 was missing the dress pieces, and contained only the pattern for the coat.
Image courtesy of the Vintage Pattern Wiki
It is a size 14 1/2 or 35 inch bust, and anyone who would like to try sewing up the coat can have it. Leave me a comment with your email address, and I'll contact you to get your mailing address. Is it just me or does anyone else think this would make a particularly classy and glamorous raincoat? Search laminated cotton to find inspiration for some lovely rain wear. 

Sunday, February 10, 2013

Dorothy is Happy...

And that makes me happy! She skipped all over the house this morning when she found her ruby slippers, which I left where she could discover them. The excited "Oh, those are ruby slippers! Thank you!" made my whole day. 

 Her thrifted square dancing dress and purple tutu complete the look :) Although I think I still have some blue and white check fabric in my stash....


And here's a preview of me trying to get her to take them off for bed tonight......


There's No Place Like Home

My little girl is pretty obsessed with The Wizard of Oz as of late. She doesn't find any of it scary, and she loves the characters and songs, of course.

After she went to bed tonight, I sewed her up her own little reminder that there's no place like home.
I made them using fabric salvaged from a ruby colored sequined child's vest I found at Goodwill today for $2, and lined them with scraps from my Matron of Honor Dress. I also used some Jiffy No Slip Sole fabric on the soles so she won't slip around in them. The pattern is the Kasey Mary Jane shoe from I Think Sew, and they went together easily. The only trouble I had was my own silly mistake because I was getting tired.

Does this make me a good witch??

They'll be waiting for our girl in the morning, and I know she'll love them! 

Monday, May 14, 2012

Mother's Day Tennis Dress and Sewing "in the Flat"

Yesterday for Mother's Day, my sweetie pie husband gave me the day off. He cooked all of our meals and cleaned up too, and I was free to get some good sewing time in. I made a dress for the baby in a cute little retro print synthetic knit I found thrifting for a quarter.

For the second time now, I sewed an entire garment "in the flat." Does anyone else do this? What the heck do I mean? Well, the instructions for the pattern I used, Butterick 5976, would have you sew the side, back and shoulder seams, then attach the collar and facing, insert the zipper next, and then ease in the sleeves and hem them (those tiny little sleeves!) before hemming the dress bottom.

Here is what I did:

  1. Serged the shoulder seams together and pressed them backward
  2. Eased in the sleeve cap and serged into place
  3. Serged sleeve hem and hemmed/stitched the opening of the sleeve while flat 
  4. Sewed the collar as usual. Serged bottom of facing and attached facing and collar to dress
  5. Understitched facing and instead of tacking stitched facing to shoulder it in the ditch through the top of the shoulder seam
  6. Serged both sides of back seam separately then sewed to zipper bottom position. Inserted zipper, and hand slip-stitched facing edge at top of zipper
  7. Serged side seams and sleeve seams all at once. Pressed seams toward back. Alternately (to allow for small adjustments later) you could serge front and back individually and sew
  8. Serged hem and hemmed it
I don't know if there is any reason not to sew this way, but I have been finding many aspects of construction easier when garments are sewn in the flat- especially kids stuff. Um, and zippers! If you are machine sewing a zipper, it is way, way easier to sew it flat without all of that extra fabric in the way. And why fuss to fold and hem a tiny sleeve when you can just sew it flat? Yes, this does make a seam that ends at the armscye, but isn't that seam hidden by the child's arm anyway? 

I'd really be interested to know if anyone else sews this way or has tried it, or if anyone knows of reasons why it might be a bad idea. 

Now that I've rambled on, here are some pics of my little munchkin in her new dress.
Courtesy of the Vintage Pattern Wiki


It is great how she is so excited to wear a dress I have made her. Sometimes she comes to me with a shirt or scarf and says, "Mommy, I made this for you!" It won't be long before we'll have a little sweatshop going!